Android TV Setup The Complete Streaming Device Guide
Table of Contents
Your Android TV Unboxing Guide
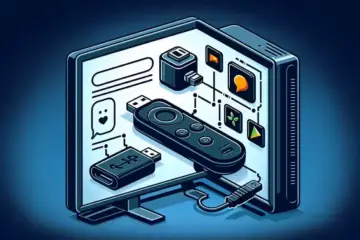
Opening your new Android TV device is the first step toward transforming your entertainment setup. This guide will walk you through what to expect inside the box and how to prepare for a smooth setup experience. Properly identifying all components ensures you have everything needed before you begin.
Most Android TV devices, such as the popular Google Chromecast or NVIDIA Shield, come with a standard set of items. You should find the main streaming device, a power adapter, an HDMI extender cable for easier connectivity, and the voice remote control with any required batteries. Additionally, check for any included documentation, such as a quick start guide or warranty information. For instance, the Chromecast with Google TV includes a remote, the device itself, a USB-C power cable, and a power adapter [Source: Google Support].
Carefully inspect each component for any signs of damage that may have occurred during shipping. Meanwhile, ensure the remote has its batteries installed or included separately. This initial check prevents interruptions during the setup process later on.
Preparing Your TV and Workspace
Before connecting your new device, prepare your television and the area around it. First, identify an available HDMI port on your TV. If your TV is wall-mounted or has hard-to-reach ports, the included HDMI extender cable will be invaluable. Furthermore, ensure you have a stable surface to place the device and its cables to avoid strain on the connections.
Next, locate a power outlet near your TV. Most Android TV devices require a constant power source via the provided adapter and cable. For optimal performance, plug the power adapter directly into a wall outlet rather than a power strip. Also, make sure your Wi-Fi network name and password are handy, as you will need them shortly. A stable internet connection is crucial for downloading updates and accessing streaming services.
Essential Pre-Setup Checklist
To ensure a seamless unboxing-to-setup transition, follow this quick checklist:
- Confirm all physical components are present and undamaged.
- Identify an available HDMI port on your TV.
- Ensure a nearby power outlet is accessible.
- Have your Wi-Fi network name and password ready.
- Gather your Google Account login details.
Having your Google Account information is critical, as it is required to access the Google Play Store and sync your preferences. If you are new to the Android TV ecosystem, you can learn more about its capabilities in our complete streaming guide. This preparation minimizes setup hurdles and gets you to your content faster. Once everything is verified, you are ready to proceed with the initial device connection and configuration.
Powering Up Your Android TV
Begin by connecting your Android TV device to a power source. Most models include a power adapter that plugs into a standard wall outlet. For example, the NVIDIA Shield TV Pro uses a dedicated power brick, while Chromecast devices often draw power through your TV’s USB port. Ensure the connection is secure at both ends.
Next, locate an available HDMI port on your television. Modern TVs typically have multiple HDMI ports labeled on the back or side panel. Insert one end of the high-speed HDMI cable into your Android TV device and the other end into your chosen TV HDMI port. Remember which HDMI input number you used (e.g., HDMI 1, HDMI 2), as you’ll need to select this source later.
Switching to the Correct Input Source
Using your television remote, press the Input, Source, or TV/Video button. Navigate through the available options until you select the HDMI port where you connected your Android TV. Your television screen should now display the Android TV setup interface or home screen.
Establishing Your Network Connection
Android TV devices require internet access to stream content and receive updates. You can connect via Wi-Fi or Ethernet, depending on your device’s capabilities and your network setup.
Wi-Fi Connection Setup
Navigate to Settings > Network & Internet on your Android TV interface. Select “Wi-Fi” and choose your network from the available list. Enter your Wi-Fi password using the on-screen keyboard. For optimal streaming performance, ensure your device connects to a 5GHz network if available, as it typically offers faster speeds and less interference than 2.4GHz bands.
Wired Ethernet Connection
For more stable streaming, particularly for high-quality content like 4K video, consider using a wired connection. If your Android TV device has an Ethernet port, connect one end of an Ethernet cable to your device and the other to your router. Some devices may require a USB-to-Ethernet adapter for this functionality. Wired connections generally provide more consistent speeds and lower latency, which is crucial for IPTV services that demand reliable bandwidth.
Completing the Initial Setup
Once connected to the internet, your Android TV may prompt you to sign in to your Google account. This step enables access to the Google Play Store for downloading streaming apps and synchronizes your preferences across devices. Follow the on-screen instructions to complete this process.
After establishing your network connection, you’re ready to install streaming applications. Popular options include Netflix, YouTube, and Disney+, along with various IPTV apps that require specific subscriptions. Many providers offer free trials to test their services before committing.
Finally, check for system updates in Settings > About > System update to ensure you have the latest features and security patches. Your Android TV is now properly connected and ready for streaming entertainment.
Getting Started: The On-Screen Setup Process
When you first power on your new streaming device, you’ll be greeted by a straightforward setup wizard that guides you through the essential steps to get online and personalized. This process typically begins with selecting your preferred language from a list of options. This initial choice ensures all subsequent menus and instructions are displayed in a language you understand, making the entire setup experience smooth and accessible.
After confirming your language, the device will prompt you to connect to your Wi-Fi network. You’ll see a list of available networks; simply select your home network. Next, you’ll need to enter your Wi-Fi password using the on-screen keyboard. A stable internet connection is crucial for streaming, so ensure you enter the password correctly. If you encounter issues, double-check your credentials or move the device closer to your router to improve signal strength.
Linking Your Google Account
The final major step involves signing in with your Google account. This is necessary for accessing the Google Play Store to download apps, including streaming services and potential IPTV apps. On the screen, you will be given a code and directed to a website on another device, like your computer or smartphone. Visit the provided web address, enter the code, and then log in with your Google email and password. This two-screen method is a secure way to link your account without needing to type a long password using a remote.
Once your account is linked, the device will automatically sync your preferences and may begin installing any apps you’ve previously used on other Android TV devices. After a brief loading period, you will be taken to the main home screen, which is your gateway to all content. From here, you can navigate to the app store to download your favorite streaming platforms. If you are considering a new service, you might want to explore options that offer an IPTV free trial to test the service before committing.
Congratulations! Your streaming device is now ready to use. You can personalize the home screen further by rearranging app channels and installing new applications to suit your viewing habits.
Finding the Best Streaming Apps for Android TV
Your Android TV comes with the Google Play Store pre-installed, which serves as your primary hub for discovering streaming applications. The store features dedicated sections like “Top Charts” and “Editor’s Choice” that highlight popular and well-reviewed apps. For more targeted searches, you can use the search function with terms like “live TV,” “movies,” or specific service names like Netflix.
Beyond the Play Store, tech publications like PC Magazine regularly curate lists of the best Android TV apps. These resources can help you uncover excellent apps you might not have found otherwise. Furthermore, our own blog provides ongoing guidance on the best streaming services and applications available.
Step-by-Step: Installing Your Chosen Apps
Once you’ve found an app you want, installing it is straightforward. Navigate to the app’s page on the Google Play Store and select the “Install” button. Your Android TV will automatically download and install the application. The speed of this process depends on your internet connection. After installation, the app’s icon will appear in your main app row or within the “Apps” section of your home screen.
If you prefer, you can also install apps remotely. Using a web browser on your phone or computer, visit the Google Play Store website, find the app, and select “Install.” Then, choose your Android TV device from the list, and the app will begin downloading to your TV.
Essential Setup and Configuration Steps
After installation, launching the app for the first time typically initiates a setup process. Most streaming services, such as Netflix and Disney+, will require you to sign in with an existing account or create a new one. Have your email and password ready for this step.
Many apps will also prompt you to adjust settings to match your preferences. This often includes:
- Setting video playback quality (e.g., Standard, HD, or 4K HDR)
- Enabling or disabling autoplay for next episodes
- Creating individual user profiles for different household members
Taking a few minutes to configure these options ensures a personalized and optimal viewing experience from the start.
Must-Have Apps to Install Immediately
To get started quickly, focus on the major streaming platforms. Netflix, YouTube, Amazon Prime Video, and Disney+ are foundational for most users. For live TV and sports, consider apps like YouTube TV, Hulu + Live TV, or Sling TV.
If you’re interested in IPTV (Internet Protocol Television) services, which offer a different approach to live content, our complete IPTV subscription guide is an essential resource. It’s also wise to explore services with a free trial before committing to a paid subscription.
Organizing Your Apps for Easy Access
As you install more apps, keeping your home screen organized becomes important for convenience. Android TV allows you to reorder your apps. Simply highlight an app icon, press the “Select” button on your remote, and choose “Move.” You can then position your most-used apps at the beginning of the list for quick access.
Some Android TV devices also support custom app shelves or folders, helping you group similar apps together, such as all your sports or movie apps in one place. A well-organized interface means less time searching and more time watching your favorite shows and movies.
Optimize Your Android TV’s Performance
To ensure your Android TV runs smoothly, start by managing storage effectively. Overloaded storage can significantly slow down performance. Regularly clear the cache for individual apps through Settings > Apps > [Select App] > Clear Cache. Additionally, uninstall applications you no longer use to free up space. For a deeper clean, consider using a dedicated file manager app to delete residual files.
Another critical step is keeping your system software up to date. Manufacturers release updates that often include performance enhancements and security patches. You can check for updates manually in Settings > Device Preferences > About > System update. Enabling automatic updates ensures you never miss an important improvement.
Enhance Picture and Audio Quality
Calibrating your display settings can dramatically improve picture quality. Begin by navigating to Settings > Display & Sound. For most users, the “Cinema” or “Movie” picture mode provides the most accurate colors out-of-the-box. From there, you can fine-tune settings like brightness, contrast, and sharpness. If your TV supports it, enabling HDR (High Dynamic Range) will provide a wider range of colors and better contrast for compatible content.
For the best audio experience, explore the sound settings. If you have a soundbar or home theater system, ensure the audio output is set to “Bitstream” or “Auto” in the Sound settings. This allows your external receiver to decode high-quality audio formats like Dolby Atmos. For those using TV speakers, enabling any virtual surround sound or dialogue enhancement features can make a noticeable difference.
Refine the User Experience
Customizing your home screen can make navigation faster and more enjoyable. You can rearrange app icons, add your most-used streaming services to the favorites row, and remove unwanted content recommendations. Some Android TV devices also allow you to install alternative launchers for a completely different look and feel.
Improve navigation speed by limiting background processes. In Settings > Device Preferences, you can often find an option to restrict background data for apps, which conserves system resources. Furthermore, using a high-speed, stable internet connection is crucial. For optimal streaming performance, a wired Ethernet connection is superior to Wi-Fi. If you must use Wi-Fi, ensure your router is on a clear channel and consider using the 5GHz band for less interference.
Finally, managing your subscriptions efficiently enhances the overall value. For those exploring different services, our guide on IPTV free trials can help you test options before committing. Once you’ve decided, our complete IPTV subscription guide assists in making a final, informed choice for your entertainment needs.
Setting Up Google Assistant Voice Control
Most modern streaming devices support Google Assistant for hands-free control. First, ensure your device is compatible and connected to the same Wi-Fi network as your smartphone. Download the Google Home app on your iOS or Android device. Open the app and sign in with your Google account. Tap the “+” icon to add a new device, then select “Set up device” and choose “Works with Google.” Search for your streaming device brand (like Roku, Chromecast, or Fire TV) and follow the linking instructions.
For devices with built-in microphones, you can typically activate Google Assistant by pressing the dedicated voice button on your remote or saying “Hey Google.” Meanwhile, you’ll need to grant necessary permissions for microphone access during setup. Test the functionality by asking “Hey Google, play Stranger Things on Netflix” or “Turn up the volume.” If commands aren’t working, check your Wi-Fi connection and ensure your streaming subscriptions are active—our complete IPTV subscription guide can help troubleshoot service-related issues.
Screen Casting From Mobile Devices
Casting content from your phone or tablet to your TV is straightforward with Chromecast-enabled devices or screen mirroring features. First, ensure both devices are on the same Wi-Fi network. For Android users, swipe down from the top of your screen and tap “Cast” or “Smart View.” Select your streaming device from the list. iPhone users should swipe down from the upper-right corner to open Control Center, tap “Screen Mirroring,” then choose your device.
Alternatively, many apps like YouTube and Netflix have built-in casting buttons. Simply open the app and tap the Cast icon (which looks like a rectangle with Wi-Fi waves in the corner). If you encounter connection issues, restart both your mobile device and streaming device. Also, check that you’re not using a VPN on either device, as this can interfere with local network discovery.
Smart Home Integration Setup
Many streaming platforms now integrate with smart home ecosystems for unified control. To connect your streaming device to Amazon Alexa, open the Alexa app and go to “Skills & Games.” Search for your streaming device’s skill