The Ultimate Firestick Setup Guide For Complete Beginners

What’s Inside the Firestick Box?
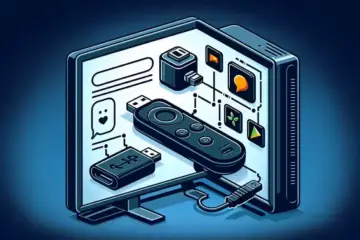
Opening a new Amazon Fire TV Stick reveals a compact collection of essential components designed for a straightforward setup. The package contains the Firestick device itself, a USB cable and power adapter for electricity, the Alexa Voice Remote, two AAA batteries, and an HDMI extender. Additionally, you’ll find quick start guides to help you begin. Each item serves a specific purpose in transforming your standard television into a smart streaming hub[1].
The Fire TV Stick Device
The main event is the small, discreet Fire TV Stick. This HDMI dongle houses the processing power and storage needed to run the Fire OS. It plugs directly into an HDMI port on your television. For optimal Wi-Fi reception, especially if your TV’s ports are cramped, it’s best to use the included HDMI extender. This short cable gives the device more breathing room, which can significantly improve wireless signal strength[1].
Its compact design is a major advantage, making it highly portable. You can easily unplug it and take your entire entertainment system to a friend’s house or a hotel. For more information on how the Firestick compares to other popular streaming devices, check out our complete streaming devices guide[1].
Alexa Voice Remote
The Alexa Voice Remote is your primary tool for navigation and control. It features standard playback buttons, navigation keys, and dedicated app shortcuts for services like Netflix, Prime Video, and Disney+. Its most powerful feature, however, is the built-in microphone. By pressing and holding the microphone button, you can use voice commands to search for content, control playback, or even check the weather without typing[1].
The remote connects to the Firestick via Bluetooth, so it doesn’t need a direct line of sight to the device to function. This means you can control your TV from another room or even with the Firestick hidden behind the television. Remember to install the two included AAA batteries to power the remote[1].
Power Supply: USB Cable and Adapter
The Firestick requires a separate power source and does not draw enough power from the TV’s HDMI port alone. The package includes a USB cable and a power adapter that plugs into a wall outlet. You must connect the USB cable to the Firestick and the power adapter to ensure stable performance. Using an underpowered source, like a USB port on your TV, can lead to performance issues or the device not turning on at all[1].
HDMI Extender Cable
This often-overlooked accessory is crucial for a reliable connection. The HDMI extender is a short cable that adds a few inches of distance between your Firestick and the crowded space behind your TV. This positioning helps prevent wireless interference from other components, resulting in a stronger and more consistent Wi-Fi and Bluetooth connection for both the device and the remote[1].
Getting Started with Your New Device
Once you have all the components identified, the physical setup is simple. Plug the Firestick (with the extender, if needed) into an HDMI port, connect the power adapter, and turn on your TV. You will then be guided through the on-screen setup process, which involves connecting to your Wi-Fi network and logging into your Amazon account[1].
After setup, you can explore a world of streaming apps. For access to live TV channels, many users look into IPTV services. You can learn more about your options in our comprehensive guide to the best IPTV subscriptions. Furthermore, several providers offer IPTV free trials, allowing you to test services before committing[1].
How to Connect Your Firestick to Your TV
First, locate an available HDMI port on the back or side of your television. Modern TVs typically have multiple HDMI inputs. For the best experience, use the HDMI 1 or HDMI ARC port if available, as these are often prioritized by the TV’s software. Insert the Amazon Fire TV Stick directly into the chosen HDMI port. If the device doesn’t fit easily due to space constraints, you can use the included HDMI extender. This small adapter provides extra clearance and can improve Wi-Fi signal reception[2].
Powering Your Firestick Correctly
Next, connect the provided USB power cable to your Firestick. You have two primary options for power. The most reliable method is to plug the power adapter into a wall outlet. This ensures a consistent power supply and prevents issues during setup or streaming. Alternatively, you can plug the USB cable into an open USB port on your television. However, some TVs may not provide sufficient power through their USB ports, which can lead to performance problems. If you choose this method and experience issues, switch to the wall outlet[2].
After connecting both the HDMI and power cables, turn on your television and select the corresponding HDMI input using your TV remote. You should see the Amazon Fire TV logo appear on your screen, indicating the device is receiving power and is properly connected[2].
Pairing Your Fire TV Remote
Once the Firestick interface loads, it’s time to pair the remote. Insert the two included AAA batteries into the remote, ensuring correct polarity. The Firestick should automatically detect the remote and begin the pairing process. If pairing doesn’t start automatically, press and hold the Home button (the house icon) for 10 seconds. This forces the remote into pairing mode[2].
Wait for the remote to appear on the list of available devices on your screen, then select it to complete pairing. The pairing process typically takes less than a minute. If you experience difficulties, ensure you’re within 10 feet of the Firestick and that there are no obstructions between the remote and device. Additionally, remove any plastic protective film from the remote that might interfere with the infrared sensor[2].
Troubleshooting Connection Issues
If your TV displays a “No Signal” message, first verify that you’ve selected the correct HDMI input. Many modern TVs have multiple HDMI ports, so cycle through each input to locate the Firestick. Check that all cables are firmly connected and that the Firestick is receiving power (indicated by a light on the device)[2].
For remote pairing problems, try moving closer to the Firestick or removing potential sources of interference such as other electronic devices. As a last resort, you can reset the remote by removing the batteries for one minute, then reinserting them and attempting pairing again. If issues persist, consider using the Fire TV app on your smartphone as a temporary remote to complete setup[2].
With your Firestick properly connected and remote paired, you’re ready to proceed with the software setup, including connecting to Wi-Fi and signing into your Amazon account. For more information on optimizing your streaming experience, explore our guide to the best IPTV subscription services available[2].
Connecting to Your Wi-Fi Network
The first step in the Firestick setup wizard is connecting to your home’s Wi-Fi. Your device will automatically scan for available networks. Select your network from the list that appears. If your network is hidden, choose the option to “Join Other Network” and manually enter your network name (SSID)[3].
Next, you’ll be prompted to enter your Wi-Fi password using the on-screen keyboard. Use the directional pad on your remote to navigate and the select button to choose characters. After entering your password, select “Connect.” A successful connection will be confirmed on-screen, allowing you to proceed to the next step[3].
Logging Into Your Amazon Account
Your Firestick requires an Amazon account to access content and personalize your experience. If you already have an account, select “I Already Have an Amazon Account.” You can then enter your email and password. For security, you may receive a verification code sent to your email, which you’ll need to enter to continue[3].
If you don’t have an account, select “I Am New to Amazon” to create one directly from your device. This process will guide you through entering your personal details. Alternatively, you can register on Amazon’s website using a computer or smartphone. Logging in links your device to your Amazon ecosystem, enabling access to your Prime Video library, app subscriptions, and personalized recommendations[3].
Installing Critical Software Updates
After logging in, your Firestick will automatically check for the latest Fire OS software updates. It is highly recommended to install any available updates immediately. These updates often include important security patches, new features, and performance enhancements that improve your device’s stability[3].
The update process is automatic but requires a stable internet connection. Your device may download and install the update, then restart. Do not unplug the Firestick during this process. The entire procedure typically takes a few minutes. Once complete, the setup wizard will resume, finalizing your device’s configuration[3].
Finalizing Your Setup
The final screens of the wizard will offer optional settings, such as enabling parental controls or setting up Alexa voice profiles. You can configure these now or skip and return to them later in the settings menu. Once you complete these steps, you’ll be taken to the main Fire TV home screen[3].
Your Firestick is now ready for use. From here, you can begin installing your favorite streaming apps. For a vast selection of live TV and on-demand content, consider exploring our guide to the best IPTV subscription services. Many providers also offer an IPTV free trial, allowing you to test services before committing[3].
Essential Streaming Apps for Your Firestick
Transforming your Firestick into a complete media center begins with installing essential streaming applications. The Amazon Appstore offers thousands of options, but focusing on core services ensures you have access to the most popular content. Netflix, Disney+, and Prime Video should be your first installations, providing extensive libraries of movies, TV shows, and original programming[4].
For live television and sports, consider adding YouTube TV, Hulu + Live TV, or Sling TV. These services offer comprehensive channel lineups with cloud DVR capabilities. Meanwhile, free streaming options like Pluto TV, Tubi, and The Roku Channel provide thousands of movies and TV episodes without subscription fees[4].
Additionally, specialized apps like Plex or Kodi can help organize your personal media collection, while music services like Spotify and Pandora complete your entertainment ecosystem. Each app typically requires between 50-500MB of storage, so plan your installations accordingly[4].
Managing Your Firestick Storage Space
With limited internal storage ranging from 8GB to 16GB depending on your Firestick model, efficient storage management becomes crucial. Begin by navigating to Settings > Applications > Manage Installed Applications to review which apps are consuming the most space. Streaming apps often cache data to improve performance, but this can accumulate over time[4].
To free up space, clear app caches regularly through Settings > Applications > Manage Installed Applications > [App Name] > Clear Cache. For more significant storage recovery, consider uninstalling apps you rarely use. The Firestick also allows you to move compatible applications to external USB storage using an OTG cable and USB drive, effectively expanding your available space[4].
Another effective strategy involves managing downloaded content within streaming apps. Services like Netflix and Prime Video allow you to delete downloaded movies and shows after viewing. Regularly monitoring your storage through Settings > My Fire TV > About > Storage helps prevent performance issues caused by low storage[4].
Organizing Your Firestick Home Screen
A well-organized home screen enhances your streaming experience by putting your favorite content front and center. The Firestick interface allows significant customization through several methods. Start by pinning your most-used applications to the top row for quick access – simply highlight any app, press the menu button on your remote, and select “Move to Front”[4].
The “Your Apps & Channels” section can be rearranged by highlighting the app you want to move, pressing the menu button, and choosing “Move.” Group similar applications together – for example, place all live TV services in one area and movie-focused apps in another. This logical organization reduces browsing time and makes finding content more intuitive[4].
Additionally, take advantage of the Firestick’s profile features if multiple people use the device. Create individual profiles for different household members to maintain personalized recommendations and watch histories. The recent row automatically displays your most recently used applications, but you can influence this by consistently using your preferred apps[4].
For advanced organization, consider using third-party launchers like Wolf Launcher, though these require additional setup steps. Regardless of your approach, a thoughtfully arranged home screen transforms your Firestick from a simple streaming device into a personalized entertainment hub that reflects your viewing preferences[4].
Optimizing Your Firestick Display and Audio
Getting the most from your Firestick starts with proper display and audio configuration. Navigate to Settings > Display & Sounds to access these crucial options. For optimal picture quality, select Display and choose the highest resolution your TV supports, typically 1080p or 4K Ultra HD. If you experience screen flickering or a blank display, your TV may not support the selected resolution. In this case, hold the Up and Rewind buttons on your remote for 10 seconds to automatically revert to a compatible setting[5].
Furthermore, the Audio settings allow you to select your preferred output format. For the best experience with a surround sound system, choose Dolby Digital Plus. If you primarily use your TV’s speakers, stereo is often the ideal selection. For an even more immersive experience, explore the Dynamic Range Settings. Setting this to “Adaptive” can automatically adjust the content’s dynamic range to match your TV’s capabilities, ensuring you see all the detail in both dark and bright scenes[5].
Setting Up Parental Controls for a Safe Viewing Environment
If you share your home with children, setting up parental controls is an essential step. Go to Settings > Preferences > Parental Controls. Here, you can create a PIN to restrict access to specific content. You can block purchases and app installations, preventing accidental or unauthorized spending. Moreover, you can set viewing restrictions for Prime Video content based on ratings, ensuring younger viewers only see age-appropriate movies and shows[5].
This feature provides peace of mind, especially when combined with a reliable streaming service. For instance, many users pair their Firestick with an IPTV subscription for access to live TV. Parental controls help you manage this vast content library effectively, creating a safe and curated entertainment space for your entire family[5].